There are different methods of screen printing, but they all involve the same basic technique. The form of printing we'll talk about below uses a special light-reactive emulsion to create a custom stencil; this tends to be the most popular type of commercial printing.
Step1:The design is created
To start, the printer takes the design they want to create on the finished product, and prints it out onto a transparent acetate film. This will be used to create the stencil.
Step 2: The screen is prepared
Next, the printer will choose a mesh screen to suit the complexity of the design, and the texture of the fabric being printed. The mesh screen is then coated with a layer of light-reactive emulsion, which will harden when developed under bright light.
Step 3: The emulsion is exposed
The acetate sheet featuring the design is then laid onto the emulsion-coated screen, and the whole thing is exposed to a very bright light. The light hardens the emulsion, so the parts of the screen which are covered by the design remain in liquid form.
If the final design is going to include more than one colour, then a separate screen must be used to apply each layer of ink. To create multi-coloured products, the printer must use his skill to design each stencil, and line them up perfectly to ensure the final design is seamless.
Step 4: The emulsion is washed off, creating the stencil
After the screen has been exposed for a set time, the areas of the screen not covered by the design will have turned hard. Any unhardened emulsion is then carefully rinsed away. This leaves a clear imprint of the design on the screen for the ink to pass through.
The screen is then dried, and the printer will make any necessary touch-ups or corrections to make the imprint as accurate as possible to the original design. The stencil is now ready to be used.
STEP 5:The item is prepared for print
The screen is then placed on the printing press. The item or garment being printed is laid down flat onto the printing board, underneath the screen.
There are a number of different presses, including manual and automatic styles, but most modern commercial printers will use an automatic rotary carousel printer, as this allows several different screens to work at once. For multicoloured prints, this sort of printer can also be used to apply the separate colour layers in quick succession.
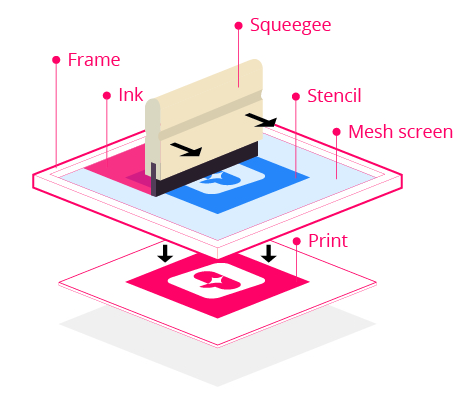
Step 6: The ink is pressed through the screen onto the item
The screen is lowered down onto the printing board. Ink is added to the top end of the screen, and a squeegee is used to pull the ink along the full length of the screen. This presses the ink through the open areas of the stencil, imprinting the design on the product underneath.
If the printer is creating multiple items, then the screen is raised and a new garment is placed onto the printing board. The process is then repeated.
Once all the items have been printed and the stencil has served its purpose, the emulsion is removed using a special washing fluid so the mesh can be reused to create new stencils.
Step 7: The product is dried, checked and finished
The printed product then passes through a dryer, which 'cures' the ink and creates a smooth, colourfast finish. The final product will be checked and washed thoroughly to remove any residue, before being passed on to its new owner.
A guide to screen printing equipment